


how-to
How to Hit a Draw and Fade on Purpose: A Launch Monitor Guide
Most golfers who own a launch monitor can tell you, after the fact, whether they've hit
The five-step on-course game plan that stops blow-up holes from wrecking your round, for golfers shooting in the 90s and 100s.

Most golfers over 90 aren't losing strokes evenly across 18 holes. They're losing them in clusters: two or three holes per round where the score balloons to six, seven, or worse. The approach shots, the tee balls, the recoveries: something breaks down on those specific holes, and the rest of the card is close to what you'd expect.
The goal here isn't to find the hardest holes on the course. It's to find the holes where your scorecard specifically goes wrong, which isn't always the same thing.
Pull the last five scorecards you have access to. A printed card works; a GPS app that stores hole-by-hole history works too. Look for holes where you scored three or more above par. Write them down. In most cases, you'll find the same one, two, or three holes appearing on card after card.
Most golfers already know, if they're honest about it, which holes those are. The round where everything came undone at the par-5 ninth, the Sunday where the par-3 fourteenth cost them four strokes above par: the pattern is usually there in memory, and writing it down from five actual cards confirms what was already suspected.
This list is your game-plan target. Not the prettiest holes on the course, not the ones with the highest stroke-index rating. The specific holes that consistently cost you strokes above the rest of your card.
One additional step while you're reviewing those cards: note what caused the big number on each hole. Was it a penalty off the tee? A failed recovery attempt from rough or trees? A three-putt after an otherwise reasonable approach? The cause tells you which of the following steps matters most on that specific hole. A hole where the damage starts from the tee needs a different plan than a hole where the damage starts from the recovery.
For most amateur golfers, blow-up holes begin at the tee. A penalty off the tee, a ball buried in rough that prevents a clean approach, a drop zone that adds two strokes before you've taken an approach shot: the chain starts with the tee ball.
The tee-shot plan for your risk holes has three elements.
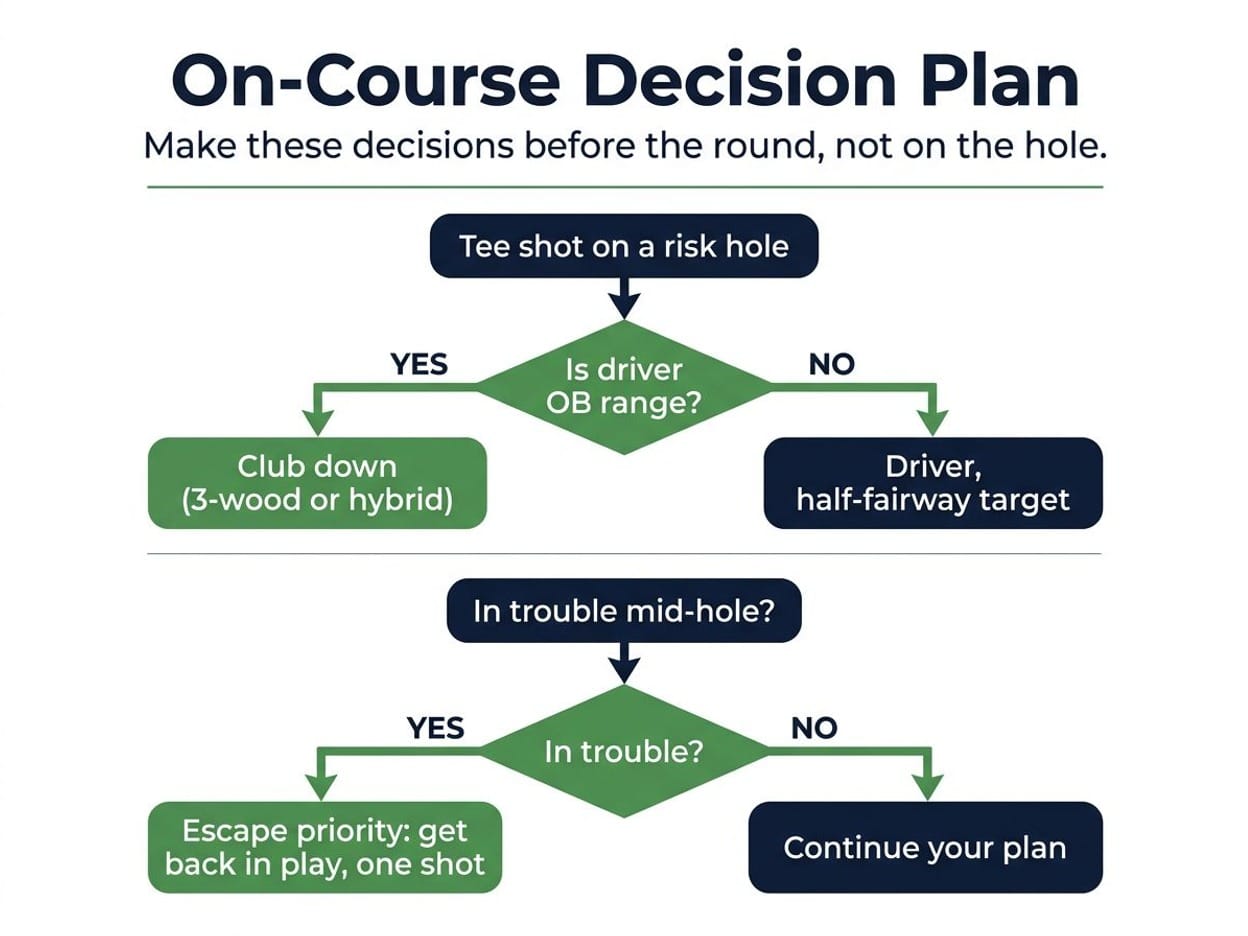
Club selection. On your highest-risk holes, the default club isn't always the driver. If your driver's miss pattern puts out of bounds in range, a 3-wood or hybrid at 80% of your driver carry removes the penalty from the equation. You reach the same fairway. Your second shot is from grass rather than from the penalty area drop zone. The 30 yards (27 meters) you give up off the tee costs less than the two penalty strokes and the reset that follows a ball out of bounds.
Target width. Aim at a half of the fairway, not a spot. The difference is significant. A miss by 10 yards (9 meters) off a "left-center" target is still in the fairway. A miss by 10 yards off a specific post or bunker edge is potentially in trouble. Widening the target isn't lowering your ambition; it's correctly calibrating the margin you're working with on a hole where the consequences of a miss are high.
The lay-up decision rule. If you're standing on the tee unsure whether to hit driver or lay up, lay up. This rule is easier to state than to follow, but it's considerably easier to follow if the decision has already been made before you're on the tee with the driver in hand. Make the decision during your pre-round plan in Step 5. Then commit to it when you reach the hole, rather than reasoning through it again mid-round with the hole in front of you and the driver already out of the bag.
When you're in trouble (deep rough, a lie behind trees, a ball in a fairway bunker with no clean line to the green), the next decision is the most consequential of the hole. And most golfers over 90 make it the wrong way, consistently.
The escape priority is a single rule: your next shot gets the ball back into a playable position. Not near the green, not on the green. Just on grass, in bounds, with a clear path to the flag for the shot after.
What this rules out is the career shot attempt. The small gap through the trees to the green. The high draw from 190 yards (174 meters) that carries the water if you catch it perfectly. Career shots land at the intended target roughly one time in five in real course conditions. The other four times, they produce a worse lie than you started with. A seven where a five was achievable. An eight where a six was on the card.
Two strokes to get from trouble back to the fairway is a recoverable situation. Two strokes to attempt a recovery, fail, and attempt another from a worse position is how sixes become eights. The escape priority cuts that chain at the first decision.
This is a rule to set before the round, not to reason through standing in rough with a gap visible between two trees. When you're on the course in that situation, the case for the career shot is compelling: the gap looks clearable, the potential reward is a birdie chance on a hole you were going to make bogey on. This is exactly when the rule matters. The pre-round commitment neutralizes the in-the-moment reasoning, which tends to be optimistic in ways that aren't borne out by the shot.
The scorecard par on a difficult hole isn't your par. For a golfer playing off 18, a par-4 rated stroke index 3 comes with a stroke allocation. The functional target on that hole is 5, not 4. A 6 is one over that target, not two over par.
This reframe has a practical effect in real time. A golfer who makes 6 on that hole and registers "two over par" is carrying inaccurate information about their round into the next tee box. A golfer who registers "one over my adjusted par, still in range" is working from a correct picture and moves on cleanly.
The exercise: before the round, go through the stroke-index column on the scorecard and mark every hole where you receive a stroke. Add one to the scorecard par on each of those holes. For a 20 handicapper, that's every hole on the card. For a 15 handicapper, that's the 15 holes with stroke indexes 1 through 15. Write the adjusted par in a corner of the scorecard, or simply know the adjusted par for the three holes that appear most often on your blow-up list.
The purpose of this step isn't to set low expectations. It's to correctly identify what's on track and what isn't. A player who's one over their adjusted par through 12 holes is having a solid round, even if the scorecard shows +4. Confusing the two is one of the more reliable ways to abandon a good round mid-way through it.
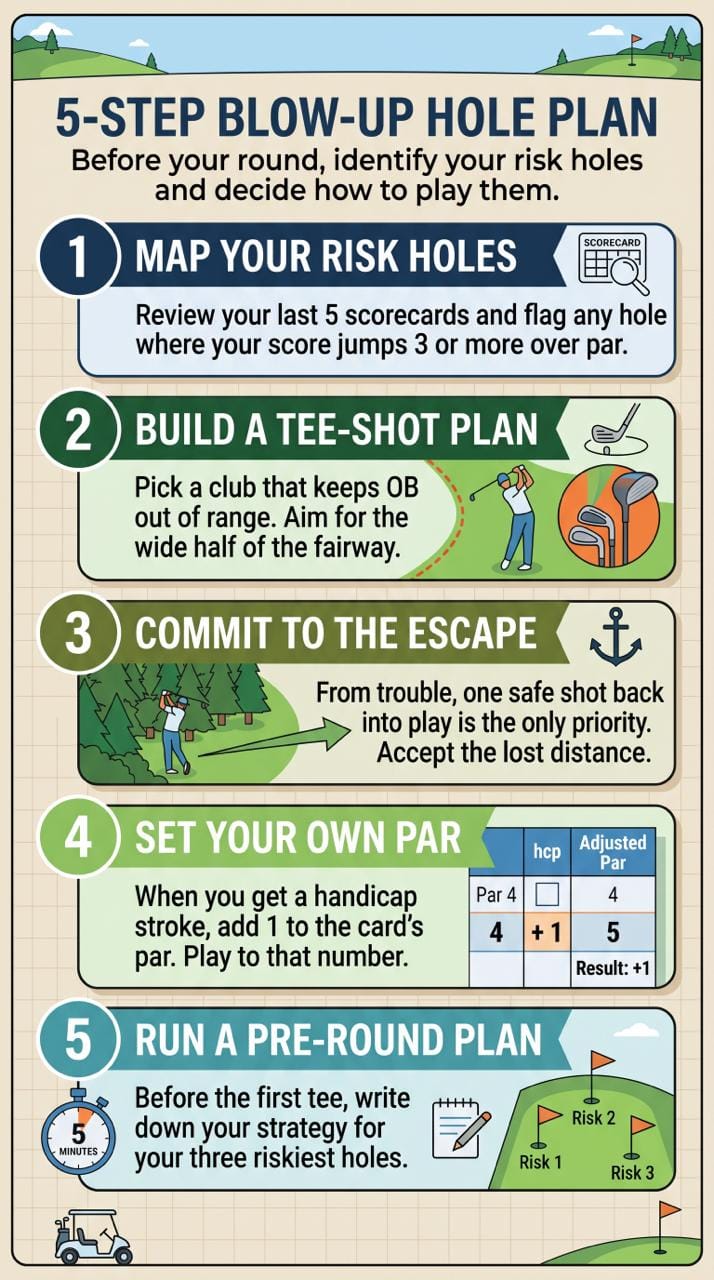
Steps 1 through 4 are frameworks. This step is where they get applied before you hit a single shot.
Before the round, take five minutes. On the first tee, or on the walk to it, think through the three holes from Step 1. For each one, make three decisions:
Three decisions, three holes, five minutes. That's the game plan. It doesn't require knowing the weather forecast, the greens speed, or the pin positions for the day. Those factors adjust on the course. The decisions about club selection, escape priority, and adjusted par are based on your game and the course layout, and they're stable from round to round.
It's worth writing these down on the back of the scorecard before you tee off. The note for your ninth hole might read: "3-wood left of bunkers / punch out right if in rough / my par is 6." Three lines, two minutes per hole. When you get to that hole mid-round, you're not making a decision under pressure. You're executing a plan that was already made.
The game plan also needs to survive the moment on the course when the driver is already in your hand and the recovery shot through the trees looks makeable. That's why it's made on the first tee. Decisions made before the round, before the emotional weight of a specific hole in front of you, hold more reliably than decisions made in real time.
Golfers who bring their scores down from the high 90s often describe the change the same way: not that their ball-striking improved significantly, but that they stopped giving strokes away on the same two or three holes. The game plan is what produces that change.
Big numbers typically result from a chain of decisions rather than a single bad shot. The sequence is usually a tee shot in trouble, followed by a recovery attempt that produces a worse lie, followed by one or more penalty situations before the hole ends. Breaking that chain at the recovery decision (committing to get back in play rather than attempting a difficult shot toward the green) is where most of the strokes are recovered. Course management decisions account for most of the damage on blow-up holes, not ball-striking.
Triple bogeys and worse almost always include a failed recovery attempt somewhere in the hole. The escape priority (committing in advance that any trouble shot goes back to a playable lie, not toward the green) is the most direct fix. Before your round, identify the two or three holes where triple bogeys appear on your recent scorecards and decide in advance: if I'm in trouble on these holes, I'm punching out. That decision, made before you're standing in the rough with a gap between the trees visible, holds better than one made mid-hole under pressure.
Course management for players shooting in the 90s and 100s is primarily about avoiding penalty situations and recovering from trouble in one shot, rather than shot shaping or trajectory control. In practice, it means choosing a club off the tee that removes OB from your miss range on risk holes, committing to the escape priority before trouble happens, and setting an adjusted par target per hole using your stroke-index allocation. The changes are in pre-round planning and in-round decision-making, not in technique.
Your handicap allocates strokes across the course through the stroke-index column on the scorecard. Every hole numbered at or below your handicap index gets a stroke. Adding one to the scorecard par on those holes gives you your adjusted par. A 15 handicapper receives a stroke on the 15 hardest holes; their adjusted par on each of those is one more than the card shows. Knowing this before you play means you can evaluate mid-round performance accurately: a 6 on a par-4 stroke-index-4 hole for a 15 handicapper is one over adjusted par, not two.
Data-backed reviews and advice that works. No brand spin.