









how-to
How to Hit a Fairway Wood Off the Ground
You can smash a 3-wood off a tee. Put the same club on the turf and the
Set up a garage golf simulator in 7 steps. Minimum 8.5ft ceiling, right launch monitor for your depth, and the projector mistake that wastes $1,500.
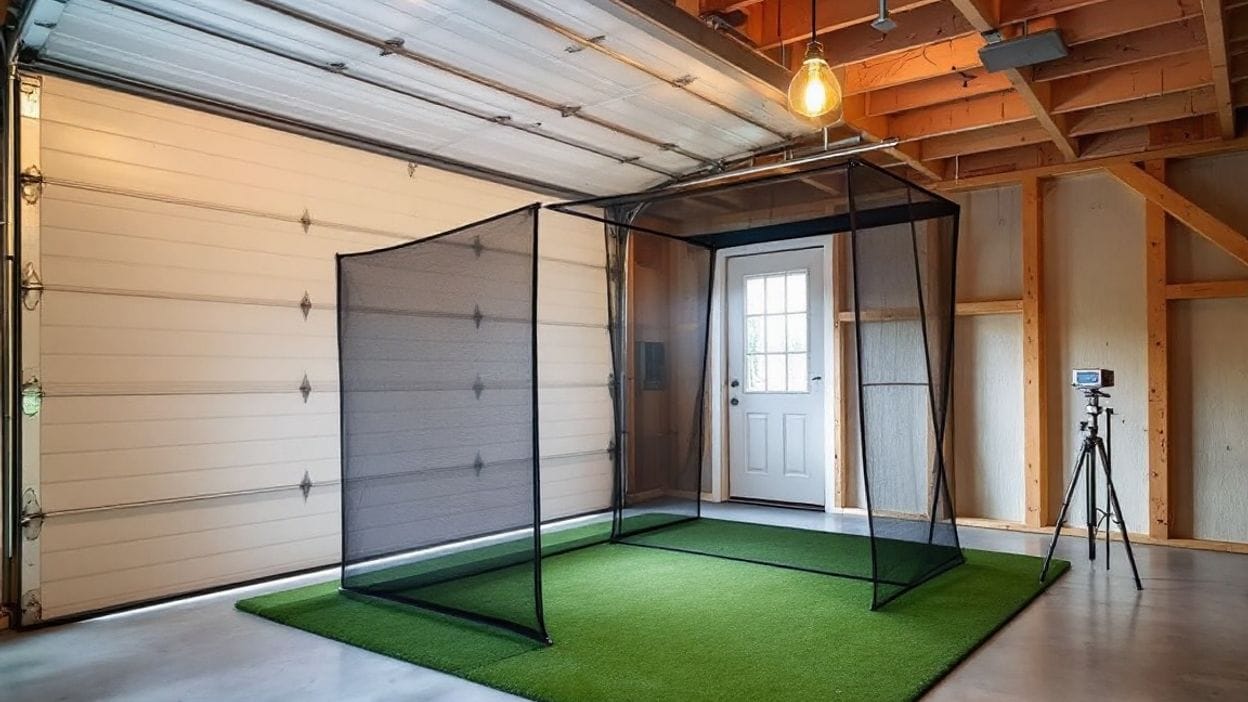
Two-car garage, partner has tentatively agreed (don't push your luck), a few grand burning a hole in your pocket. The gap between a garage golf simulator you love and one that gathers dust comes down to getting six or seven decisions right before you spend a dollar. Here's the order.
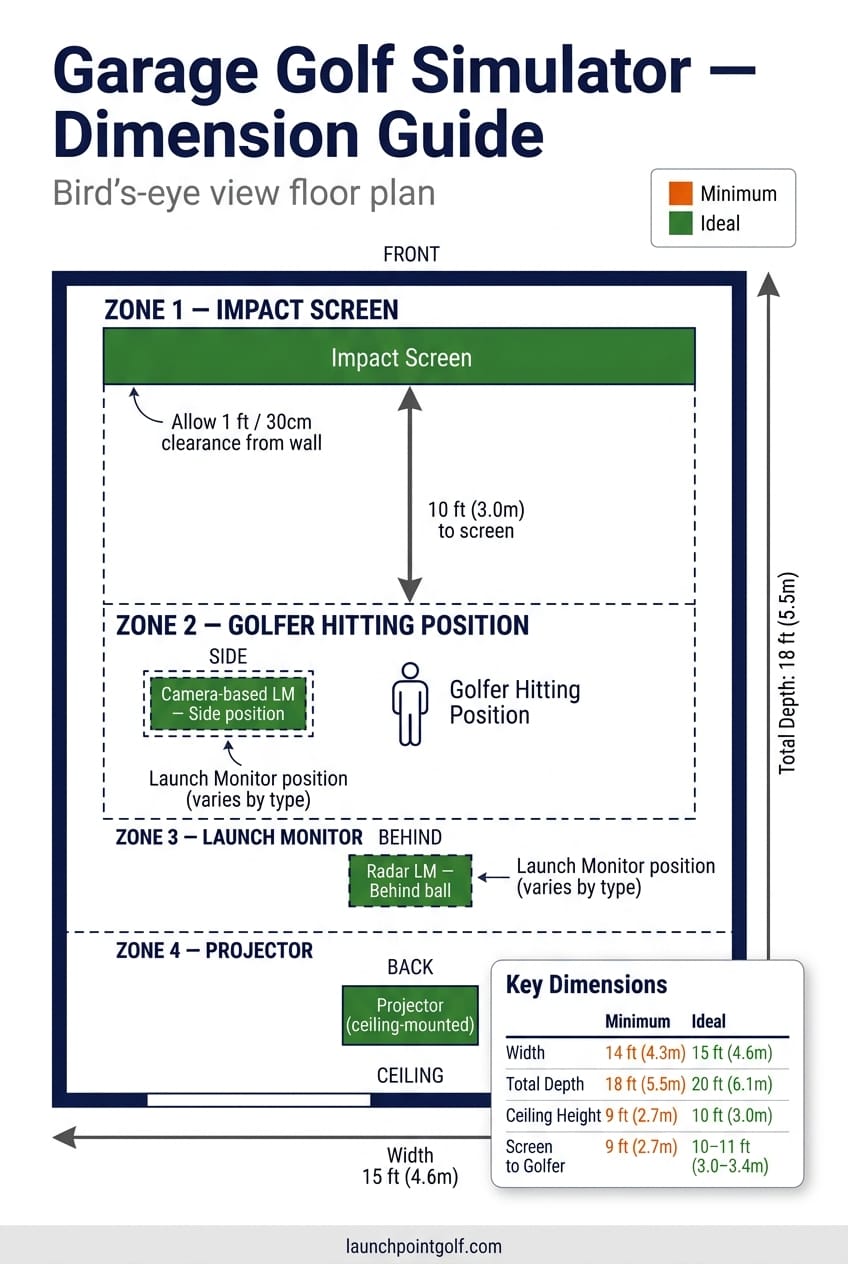
Three prerequisites before any of this is worth doing.
Space. A clear box of at least 8.5ft (2.6m) ceiling, 10ft (3.0m) wall to wall, 15ft (4.6m) front to back. Below those numbers, you're swinging half-clubs or buying gear you'll resent. Measure with the door open and tracks installed: they eat 6 to 12 inches (15 to 30cm) off the front third of most two-car garages, exactly where your projector wants to live.
Power. A standard 15A circuit trips the moment a projector, launch monitor, gaming PC, and electric heater spin up together. Plan for a dedicated 20A line. An electrician charges $200 to $400, and it's the best $300 you'll spend on the build.
Temperature. A garage hits 35 degrees F (2 degrees C) in January across the US, UK, and Canada, and a closed garage in Brisbane or Phoenix touches 110 degrees F (43 degrees C) in summer. Camera-based launch monitors hate cold. Impact screen adhesive hates heat. Plan for both ends. Fix is in Step 7.
Three dimensions matter, in order of how hard they are to fix.
Ceiling height. Hardest to change, full stop. If your ceiling is 8ft (2.4m) and you're 6ft (1.83m) tall swinging a driver, you're going to hit it. Trey Greene at Assembled Golf sets the absolute floor at 8.5ft (2.6m), and only if you're under 6ft and you've passed the driver test. Trackman recommends 10ft (3.0m) and up.
Width. Ten feet (3.0m) minimum, per Carl's Place. Fourteen to fifteen feet (4.3 to 4.6m) is the recommended target, per Trackman and Carl's Place, in line with what Assembled Golf calls ideal. You want side clearance for your trail elbow and lead arm not to flinch on the takeaway. A 10ft (3.0m) garage with paint cans against one wall is an 8ft (2.4m) garage in practice, and at 8ft you've got a problem.
Depth. Fifteen feet (4.6m) is the workable minimum, per Carl's Place. Eighteen feet (5.5m) is the recommended target, per Trackman and Carl's Place. That depth is swing and enclosure space every setup needs, camera or radar. Radar units like Trackman 4 and Mevo+ specifically need clear space behind the ball to track flight; camera-based units like SkyTrak and Foresight's GC3 capture from beside the ball instead, but the room itself still needs the same depth.
The driver test: take your longest club, set up where you'd hit from, make a slow full swing. Top of the backswing, finish, follow-through. If the head clears ceiling and walls with a foot (30cm) of margin, you're good. If not, you've found your real space, not the one on the tape measure.
Ever hit the range in spring after a winter of indoor practice and wonder why your distances were down? That's Indoor Swing Syndrome. In a tight space, your body knows. You shorten the backswing without noticing, and six months later your outdoor swing has 10 yards (9.1m) less carry. Build with margin, or accept you're building a chip-and-pitch room.
| Dimension | Minimum | Ideal |
|---|---|---|
| Ceiling height | 8.5ft (2.6m) | 10ft (3.0m) |
| Width | 10ft (3.0m) | 15ft (4.6m) |
| Depth | 15ft (4.6m) | 18ft (5.5m) |
| Source | Assembled Golf (Trey Greene), Trackman | |
Three honest tiers. Pick the one your space and budget support, not the one you wish they did.
Tier 1: DIY net plus launch monitor. $500 to $1,500 (£400 to £1,200, AU$800 to AU$2,300). A hitting net, a decent mat, and a launch monitor like the Garmin Approach R10. No projector, no screen, no subscription. Right starting point if you're not sure you'll use the room enough to justify $5K.
Tier 2: Mid-range full simulator. $1,500 to $5,000 (£1,200 to £4,000, AU$2,300 to AU$7,600). Impact screen, enclosure kit, short-throw projector, mid-tier launch monitor (SkyTrak+, Garmin R50, Mevo+ with the depth), and a real hitting mat. Where most home simulators live. Launch numbers within touring tolerance for most clubs.
Tier 3: Premium dedicated. $5,000 to $15,000+ (£4,000 to £12,000+, AU$7,600 to AU$23,000+). Foresight GC3 or Uneekor EYE MINI, full-frame enclosure, 4K laser projector, commercial-grade flooring. A built room, not a bay. If you've got the space and 200+ rounds a year, the math works. If not, you're paying for the badge.
Not sure which tier is right for you? Start smaller than you think, because most people who build at Tier 3 first end up wishing they'd tested the habit at Tier 1 before committing. Phased build is the smart move. Start at Tier 1. If you're still hitting weekly after three months, add the screen and projector. The launch monitor carries forward, so you don't waste a dollar.
Depth sets your baseline, not your monitor type. Every setup needs the same 15 to 18 feet (4.6 to 5.5m) of room to swing and let the sensor do its job. What changes by device is where that sensor needs a clear sightline, not how much total depth you need.
A camera-based launch monitor is a unit that reads ball and club data at the moment of impact using high-speed imaging, rather than tracking flight through radar. Because it captures from beside the ball instead of tracking it downrange, a camera-based unit needs a clear sightline next to the hitting position, not behind it, though the room itself still needs the same 15 to 18 feet (4.6 to 5.5m) of depth for your swing and the ball's travel. SkyTrak+, Foresight GC3, and Bushnell Launch Pro all work this way. Trade-off: most need a calibrated stance and don't love being moved between sessions.
Radar units need that same room depth, they just need it clear behind the ball. Mevo+, Full Swing KIT, and Trackman 4 use Doppler and need the ball to travel before they lock the numbers, so they want the space directly behind the hitting position kept open. A room under the 15 foot (4.6m) minimum is too tight for any launch monitor, camera or radar, not radar alone.
Overhead ceiling-mount LMs (Uneekor EYE XO, GCHawk) need 9ft to 10.5ft (2.7m to 3.2m) of ceiling and a permanent mount. Cleanest visual setup, since nothing sits next to the ball, but you've committed to the room.
By tier, here's where I'd land:
Net for Phase 1. Impact screen if you want to play courses.
A net costs $150 to $400, needs no projector, and gets you 80% of the launch monitor benefit (numbers, club path, dispersion). Right answer for pure practice. Downside: you're staring at green mesh, not Augusta.
An impact screen is the difference. Project the course, hit through it, watch ball flight. Decent standalone screens start at $300; full enclosure kits from GoSports or Carl's Place run $400 to $1,000. Carl's Place is the standard most home builds settle on, durability being the reason. Cheap screens stretch and tear after 200 to 300 driver shots. A good one goes three years.
Concrete is brutal on joints. Don't hit off it.
Build, ground up: 1/2-inch (12mm) rubber base or interlocking foam tiles across the bay. Turf on top, edge to edge. Then a hitting mat in the actual zone, sized to your stance plus a foot (30cm) of margin each side.
The cheap-mat-on-concrete combo is how you end up with golfer's elbow. The mat absorbs nothing. Every fat shot transfers up the shaft into your lead wrist, and the damage shows up at week six. A $100 mat on a $30 rubber base beats a $200 mat on bare concrete.
By tier:
Three mounting options. Only one is good.
Ceiling-mount behind the golfer is the right answer. Projector lives above and behind your stance, the beam goes over your head onto the screen, and your shadow stays out of the picture. Throw ratio is the distance from the projector lens to the screen divided by the screen width - a 0.5 to 0.7 throw ratio means you can mount the projector 5ft to 7ft (1.5m to 2.1m) from the screen and still fill it completely.
Frame-mount on the enclosure works as a backup. Most kits sell a top-bar mount that drops the projector forward of the hitting zone. Fine in principle, but it sits in the ball-flight cone. One slice, and you've launched a golf ball into a $1,500 piece of glass. Not ideal.
Floor-mount is a non-starter. Heat, dust, and a brutal upward keystone that washes out the image. Skip it.
Lumens: 3,000 minimum. Garages have ambient light bleeding in around the door seal, and a 1,500-lumen unit looks gray and washed out. 4,000+ if you're going Tier 3.
Critical, do not skip: DLP projectors strobe at 120Hz through a spinning color wheel. That strobe corrupts the camera shutter on SkyTrak+, Foresight GC3, Bushnell Launch Pro, and most other camera-based launch monitors. The fix is a 3LCD projector. Epson's home cinema range (EpiqVision, Home Cinema) is the safe pick. Radar-only LM, DLP is fine. Camera-based LM, 3LCD is mandatory. This one decision saves you a week of debugging.
Four issues a garage build hits that a basement or spare-room build doesn't. Plan for all of them.
1. Garage door opener. A standard torsion-spring opener has a rail running down the middle of the ceiling, where your projector wants to live. Swap it for a jackshaft or side-mount opener that drives the door from a motor next to the torsion bar. LiftMaster 8500W and Sommer Direct Drive are the two common picks. Conversion runs $300 to $500 installed and gives you back the full ceiling.
2. Electrical. Dedicated 20A circuit from your panel to a quad outlet at the rear of the bay. A 4K projector, gaming PC, launch monitor, and 1500W heater on one circuit will trip the moment all four spin up. Line costs $200 to $400 with an electrician, and it's the difference between "works" and "trips the breaker every Sunday".
3. Temperature. A ceiling-mount electric heater (Fahrenheat, King) at $200 to $400 holds a two-car garage at 50 degrees F (10 degrees C) in winter, door sealed. A 12,000 BTU mini-split at $1,200 to $2,000 installed handles heat and AC. Insulate the door (foam panels, $80) and walls (R-13 batts) before spending on heat. An uninsulated garage eats any heater you put in it.
4. Ambient light. Blackout curtains on the door interior plus foam board panels on the enclosure sides kill 90% of the light bleed. Picture goes from dim gray to good-looking. Total spend: about $80.
The seven I see most.
Building or buying a home golf simulator? I put the research most buyers do the hard way into one place. The Home Golf Simulator Handbook walks through picking the right launch monitor, fitting the setup to your actual space, and building a practice plan that pays off, without the brand loyalties or affiliate pressure that shape most buying advice.
8.5ft (2.6m) is the absolute floor, per Assembled Golf, and only if you're under 6ft (1.83m) tall. 10ft (3.0m) is the recommended minimum from Trackman and most pros. Below 8.5ft (2.6m) you're swinging short irons and wedges only; the driver will clip the ceiling on a full backswing.
Yes, with limits. A typical single-car garage is 12ft (3.7m) wide by 20ft (6.1m) deep, enough for a camera-based setup. The constraint is usually ceiling height, since single-car garages often have 8ft (2.4m) ceilings. If yours is 8.5ft (2.6m) or above, you can build a workable Tier 1 or Tier 2 setup.
No. A launch monitor and a hitting net give you all the data (clubhead speed, ball speed, launch angle, spin, carry, dispersion) without a projector or screen. You read the numbers off your phone or a tablet.
A net stops the ball and shows you nothing. An impact screen stops the ball and shows you the projected image of the course. Net costs $150 to $400. Screen plus enclosure runs $400 to $1,000. The screen is what makes it feel like simulator golf instead of practice golf.
Not well. Radar units (Mevo+, Full Swing KIT, Trackman 4) need 18ft (5.5m) or more so the ball has room to travel before hitting the screen. In a 14ft (4.3m) garage you'll get errors and inconsistent numbers. The Garmin R10 is the exception, because it estimates carry from early-flight data.
Avoid DLP. The color wheel strobes at 120Hz and corrupts the shutter on camera-based units like SkyTrak+, GC3, and Bushnell Launch Pro. Use a 3LCD projector instead. Epson's Home Cinema and EpiqVision lines are all 3LCD. If your LM is radar-only, DLP is fine.
Start with the launch monitor. It's the one piece of kit that carries forward through every tier, so a day spent on that decision saves you money on the rest. The full home simulator build guide goes deeper on basement and dedicated-room builds if your space isn't a garage. For sub-$1K launch monitor options, check back soon - that guide is coming. And once you've got the dimensions sorted, a room planning guide is in the works too.
Build small first, hit balls every week, and add gear when the room earns it.
Some links in this article are affiliate links. If you buy through them, I earn a small commission at no extra cost to you. This never influences what I cover or recommend. I link to gear I'd buy myself.
Data-backed reviews and advice that works. No brand spin.